Licence CC BY-NC-ND, Thierry Parmentelat
problem statement
the puzzle is a 3x3 board with 8 tiles numbered from 1 to 8, and a hole (that we
note 0 or - depending on the context).
the hole is free to swap with any of the up to 4 adjacent tiles (no diagonal move); here’s an example
note that the goal is to bring the board into the configuration depicted in the rightmost position below
objectives
depending on the time you have, and on your abilities, you can choose to do one of the following:
write a solver, i.e. an algorithm that finds how to solve a given puzzle
create a GUI that allows to
enter a puzzle starting position,
or generate a random starting positioncompute and animate the solution
or, if no solution exists, display a messageand optionally, allows to play the game manually
vocabulary
a board is the state of the puzzle at a given time;
the graph models allowed moves; it contains as many nodes as there are boards, and each edge represents a single move in the puzzle;
note that, most of the algorithms will be based on that graph, but you do not necessarily need to explicitly build this graph in memory !a graph browsing algorithm is an algorithm that allows to browse the graph, i.e. to visit all nodes and edges of the graph;
there are many such algorithms, and they are often based on the idea of maintaining a queue of nodes to visit;
the most famous such algorithm is the breadth-first search (BFS), but there are many others, such as the depth-first search (DFS), the Dijkstra algorithm, the A* algorithm, etc...a priority queue is a data structure that is very well suited when you have a large collection of objects that you need to maintain sorted by a given criterion;
more on this later, but in our case we may want, for example, to maintain a collection of boards sorted by their distance from a reference node;
the solver
the Dijkstra algorithm
the Dijkstra algorithm is a graph browsing algorithm ,that allows to find the
shortest path from a given node to all other nodes in the graph (i.e. all the ones that are reachable, of course)
it is based on the idea of maintaining a priority queue of nodes to visit;
each node in the queue will have a priority that amounts to its shortest distance from
the starting node:
data structures hints
focusing on the Dijkstra algorithm and Python, here are a few hints that may help you out, if you are unsure how to proceed:
board representation (1)
you need to choose a way to represent a board; for that you have many options, like
a sequence (list or tuple) of 9 numbers
a string of 9 characters
a numpy array
a class of your own
...
however, please pay attention to the fact that you will probably want to use boards:
in structures like sets or dicts - so its needs to be hashable
in a priority queue, which implies sorting, so you need a sortable representation as well
(see next paragraph on how to make your own class both hashable and sortable)
also please be aware that my early attempts at using a numpy array tended to be end up being - counterintuitively maybe - rather slow, so you may want to avoid that
board representation (2)
as part of this decision, you need to choose whether to model boards as native Python objects, or as class instances
both approaches are valid, but the latter is likely to lead to a much cleaner code, and more easily modifiable,
which is an important point when time matters
so, note that if you choose to use you own class:
in order to make it hashable, you just need to implement the following methods:
__eq__to allow to compare boards__hash__to allow to use boards as keys in dicts or sets
this typically returns the hash of the underlying representation;
that is to say, if for example you choose to represent a board as a stringself.internal, then the__hash__method will returnhash(self.internal)
and to make it sortable, you can go with implementing only
__lt__(stands for lower than)
which is enough to describe order among instances of your class
(for a deeper discussion, see also https://docs .python .org /3 /library /functools .html #functools .total _ordering)
note however that in my solution, I did not even had to resort to that, thanks todataclass, more on this in this section below
board and priority queue
similarly, when inserting a board in the priority queue, what is actually
inserted in the queue is a bundle of 2 elements: the board and its priority
if needed, see the appendix on using PriorityQueue on how to do that
graph representation
also note that, although all the explanations refer to “the graph”, there is again no need to actually build the graph in memory beforehand:
you can simply iterate over the neighbors of a given board on the fly !
further details on this algorithm
useful link
you will find many resources on the web about this problem, which is ultra-classical and very well known;
I’d like to outline in particular the one below, where you will find very useful hints as to how to implement the Dijkstra algorithm in Python;
performance
as an indication, a Python program that computes all the shortest paths from the goal board to all other boards in the graph takes about 2 seconds to run on my laptop
you may experience a much longer runtime at first, because maybe you have not picked the right data structures, or because you have not implemented the algorithm in an efficient way
in that case, please refer to the appendix on profiling for some hints on how to improve the performance of your code
you’re done early ? other algorithms
Dijkstra is just one of many graph browsing algorithms; another famous one is the A* algorithm, which is a variant of Dijkstra that uses a heuristic to guide the search
in terms of coding, the A* algorithm tends to be a little more complex, as there is a need to choose and implement a good heuristic; this is why we advise to start with Dijkstra, and then move to A* if you have time; as outlined in the linked page above, both algorithms are very similar in their structure if you use a priority queue
if you are done early, or want to pursue your work after the hackathon, you can
alter your code so it works on any dimension, not just 3x3
write a variant of the solver that uses the A* algorithm,
and then compare both implementations on larger board sizes
this will show you why A* is quite useful too, even if it’s not guaranteed to be optimal
the GUI
as for the GUI, you can use any library you want; here we’re going to quickly
describe the flet library which is a simple Python
library that allows to create a GUI in a few lines of code; the resulting app
can then be run as a standalone app, or in a browser
flet widgets
the basic idea is that the library gives you a Page object, that you can
populate with a hierarchy of widgets as Python objects, that your code can then interact with
here are a few introductory words - feel free to skip of you have used the library already
(but don’t copy this code just yet, read also further on)
a simplistic program
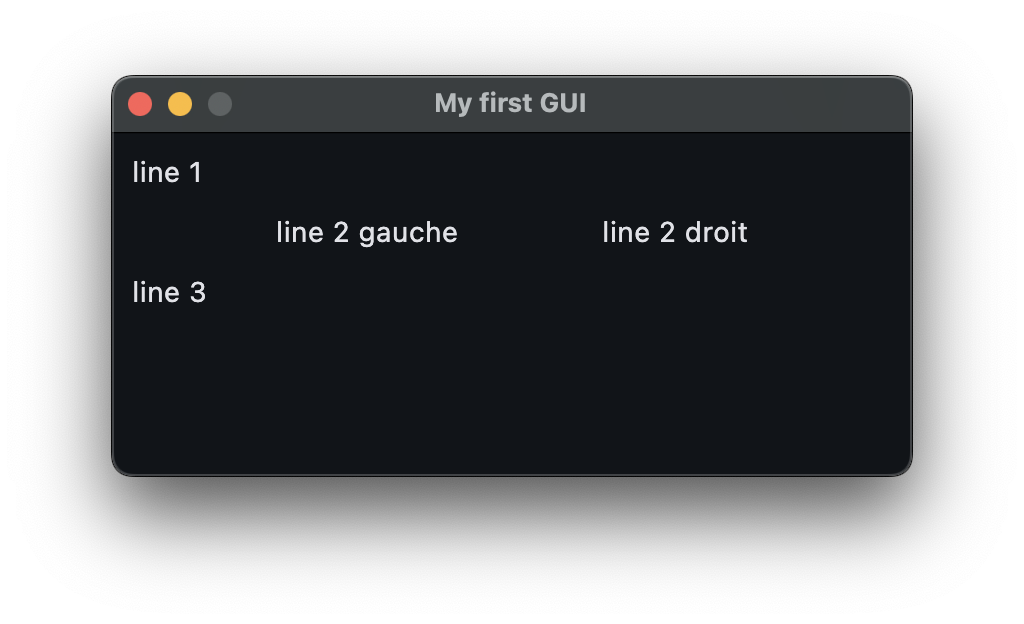
in its simplest form, a flet program looks like this
notice the way the application is started
also notice the way the layout is built by nesting a row inside the column
and how this layout is fined-tuned using alignment bookmark this for later, but the details are here https://
flet .dev /docs /reference /types /mainaxisalignment/
a very basic, but working, flet program
import flet as ft

def main(page):
    page.title = "My first GUI"
    page.window.width = 400
    page.window.height = 200
    page.window.resizable = False

    page.add(
        ft.Column(
            [
                ft.Text("line 1"),
                ft.Row(
                    [
                        ft.Text("line 2 gauche"),
                        ft.Text("line 2 droit")
                    ],
                    alignment=ft.MainAxisAlignment.SPACE_EVENLY,
                ),
                ft.Text("line 3"),
            ],
        )
    )

ft.app(main)
in our case
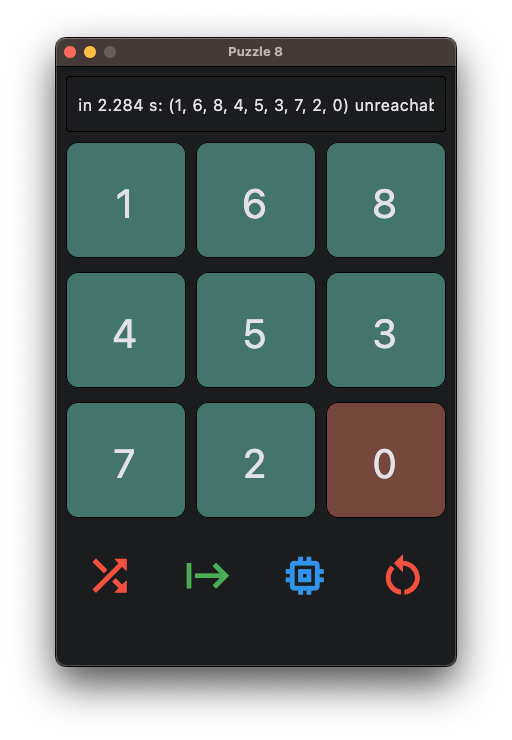
typically, in order to create a GUI that looks like this (this is just a suggestion of course, you can and should do whatever you want in terms of layout and capabilities), you would instead build a widget tree like this :
    ft.Column([
      ### header
      ft.Row([
        # message area
        ft.TextField(...)
      ]),
      # main area
      ft.GridView(
        # the 9 digits
        [ ft.TextField(...), ..., ft.TextField(...)]),
      # footer
      ft.Row([
         # the 4 buttons
         ft.IconButton(...), ..., ft.IconButton(...)]),
      )
    ]
and from then, your job is to
keep references to the created widgets, in order to be able to interact with them later
define the callbacks that will be called when the user interacts with the widgets
find the right settings to make the widgets look like you want
below are further hints and considerations, particularly for first-timers
create widgets vs change widgets
you must understand that each time you call, e.g. ft.TextField(), you are creating a widget
one common mistake by first-timers is to
write a function that takes as argument a board, and build the UI from that (i.e. create the widgets)
there’s nothing wrong so far, but then if the same function is called each time the board changes (e.g. when you want to animate a solution found by the solver), then everything is broken, because you keep on adding widgets in the UI, and nothing is going to work as expected !
so instead, you need to make sure that
you create the widgets once when starting the app
and later on your code only changes the widgets, by doing something like e.g.:
# create the widgets ONCE

squares = [ft.TextField(...) for i in range(9)]

# just a dummy example of some callback you could want to write
# the point is to only CHANGE the widgets, and NOT CREATE them again !

def reset(board):
    for i, square in zip(board, squares):
        square.value = i


def main(page):
    page.add(
        # here comes the structure seen above
        ft.Column(
            ...                   # the message area
            ft.GridView(squares, ...),   # main area
            ft.Row(
                ...               # the icons below
            ),
        )
    )
using globals or not
now, with the code above, it’s easy to “retrieve” the widgets, because they are now stored in the global variable squares
this is considered a poor practice though, (mainly because global variables mean poor or no reusability)
so once you get this working, you could optionnally try to be a little smarter, and avoid the global
however that’s an easy first step to get something working, if again you have never written anything like this before
page.update()
also, as explained in the library documentation, don’t forget to add page.update() whenever necessary
(you can also call update() on an inner widget if that’s more convenient)
but without a call to this function, your changes will remain in memory and won’t be reflected on the actual screen !
see v02 below for an example
do not overuse
because this function actually involves updating the display, this is a relatively slow operation, so make sure to not call it too often either !
starter code (optional)
if you feel comfortable, just read on
if you need more help in putting together your UI, here are the possible 2 first steps to get you started
again this is just one of the many possible paths forward:
in v01
we create a totally passive UI; it is helpful so you can understand the basics:
it defines the game as a function that returns a
Columnthat can be added to the pageit defines a
main(page)function, which is a requirement offletwe just call
ft.app(main)that actually runs the whole UI it isft.appthat actually creates thePage(the main window) object, and passes it tomain
don’t copy this code either, v02 is more suitable as a starter code, but v01 should help you grasp how v02 actually works
a possible v01
"""
just the skeleton as a demonstration of the layout
"""

import flet as ft

def puzzle8():
    """
    returns a Column object suitable for inserting in a Page
    """
    game_widget = ft.Column(
        [
            ### header
            ft.Row([
                # message area
                ft.Text("a message area")
            ]),
            # main area
            ft.GridView(
                # the 9 digits
                [ ft.TextField(str(i)) for i in range(9) ],
                runs_count=3,
            ),
            # footer
            ft.Row([
                # the bottom buttons
                ft.IconButton(ft.Icons.SHUFFLE),
                ft.IconButton(ft.Icons.START),
            ]),
        ]
    )
    return game_widget

def main(page):
    page.title = "Puzzle 8"
    page.window.width = 400
    page.window.resizable = False

    # insert the game widget in the main page
    page.add(puzzle8())

ft.app(main)
in v02
this version has a few changes as compared with v01
this time it defines the game as a class that inherits the
Columnclassthis way we can simply insert a
Puzzle8instance in the page, just as it were aColumnobject (and to an extent, it is also aColumnobject thanks to the inheritance)and the additional benefit is we can keep track of the various “pieces” in the game
this is illustrated in a sample callback
my_callback, that we bind to the second button (start_button)
a possible v02
"""
same as puzzle8-01.py but we replace the function with a class
"""

import flet as ft

class Puzzle8(ft.Column):
    """
    a Column object suitable for inserting in a Page
    and that has references to the various parts of the game
    """

    def __init__(self):
        """
        build the same widget tree as in v01
        but keep references to the key parts
        as attributes in the object
        """
        squares = [ ft.TextField(str(i)) for i in range(9) ]
        children = [
                # message area
            ft.Row([ message_area := ft.Text("a message area") ]),
                # the 9 squares organized in a 3x3 grid
            ft.GridView(squares, runs_count=3),
                # the bottom buttons
            ft.Row([
                shuffle_button := ft.IconButton(ft.Icons.SHUFFLE),
                start_button := ft.IconButton(
                    ft.Icons.START,
                    # a callback that gets called when the button is clicked
                    # we could also have simply said
                    # on_click=self.my_callback
                    on_click=lambda e: self.my_callback(e),
                ),
            ])
        ]
        # initialize as a Column
        # i.e. call the superclass constructor
        super().__init__(children)

        # keep the references for further use in the methods
        self.message_area = message_area
        self.squares = squares
        self.shuffle_button = shuffle_button
        self.start_button = start_button

    # a callback is required to take an event parameter
    def my_callback(self, event):
        """
        an example of a callback that gets called when the start button is clicked
        it just does a few changes as an example
        """
        # with a click the event does not carry much information
        print("in my callback, event=", event)
        # change the message
        self.message_area.value = "button clicked"
        # change the upper-left corner square
        self.squares[0].value = "X"
        # do not forget to do this otherwise no change will show
        self.update()


def main(page):
    page.title = "Puzzle 8"
    page.window.width = 400
    page.window.resizable = False

    # insert the game widget in the main page
    page.add(Puzzle8())

ft.app(main)
you could consider using this code as a starting point for your app, provided that you have followed the construction up to this point of course.
appendix 1: some test data
note that not all boards are reachable from a given board (there’s a parity
argument here, but we won’t go into the details);
with our convention that the goal is “1 2 3 4 5 6 7 8 0”, here’s a sample of
boards with their respective shortest distance; the last one is unreachable
# here are a few solvable problems, with their minimal distance to the goal
problems = []
problems.append(("1 2 3 4 5 6 7 0 8", 1))
problems.append(("1 2 3 4 5 6 0 7 8", 2))
problems.append(("1 2 3 0 5 6 4 7 8", 3))
problems.append(("2 0 3 1 5 6 4 7 8", 5))
problems.append(("5 0 2 1 8 3 4 7 6", 9))
problems.append(("6 1 3 2 0 8 4 7 5", 12))
problems.append(("6 1 8 0 3 2 4 7 5", 15))
problems.append(("6 1 7 2 0 3 5 4 8", 18))
problems.append(("6 1 8 3 4 5 7 0 2", 21))
problems.append(("6 1 5 7 0 8 4 2 3", 24))
problems.append(("6 1 4 5 3 0 8 2 7", 27))
problems.append(("8 6 7 5 0 1 3 2 4", 30))
# this one is not reachable
problems.append(("6 1 7 4 5 2 3 8 0", float('inf')))
appendix 2: priority queue
in Python for keeping a collection of objects sorted, in an efficient manner,
there is a dedicated data structure:
the PriorityQueue class, exposed by the the queue module (and FYI, there’s also heapq which is a little lower level)
here is a little more information on how to use this stuff
with numbers
first with simple, atomic, objects:
# how to use a PriorityQueue

from queue import PriorityQueue

# create
Q = PriorityQueue()

# populate
Q.put(50)
Q.put(0)
Q.put(100)

# will print the items in the "right" order i.e. 0 50 100
while not Q.empty():
    print(Q.get())
0
50
100
with objects
in our case though, the items that we need to store in the queue are not simple
numbers like in this simplistic example
but instead boards that we want sorted by some sort of priority
so we need to use a trick to make this work; this is where the sortable business comes in
# imagine now the items in the queue are boards
# (or any other class instances) with a related priority

# some class - imagine this is a Board
class Stuff:
    pass

# we define an accessory class

from dataclasses import dataclass, field

# with order=True, we say we want a sortable class
@dataclass(order=True)
class Item:
    # will be used for sorting
    priority: int
    # will NOT be used for sorting
    item: Stuff=field(compare=False)
# and then we can use it like this
from queue import PriorityQueue
# same as before
Q = PriorityQueue()
# same for populating, but with instances
Q.put(Item(50, Stuff()))
Q.put(Item(0, Stuff()))
Q.put(Item(100, Stuff()))
# will print the items in the "right" order i.e. 0 50 100
while not Q.empty():
print(Q.get())Item(priority=0, item=<__main__.Stuff object at 0x7fd614122990>)
Item(priority=50, item=<__main__.Stuff object at 0x7fd605e30440>)
Item(priority=100, item=<__main__.Stuff object at 0x7fd614122c10>)
appendix 3: profiling
finally, if you need to improve your code performance, your best friend is the
profiler;
the full documentation is here:
https://
profiling is more relevant than simply measuring the time spent in a function, because it allows to identify the functions that are called the most often, and that are thus the most time-consuming
there are two ways to use the profiler
either from the command line,
or from within your code
here’s how to do it from the command line (see the link above if you want to do it from within your code)
imagine you have a program
myprogram.pythat you want to profile; if you just invoke it in the terminal with# instead of running it "normally" with e.g. $ python myprogram.py # you just do # ↓↓↓↓↓↓↓↓↓↓↓ $ python -m cProfile myprogram.pythen the profiler will run the program, and at the end will print a summary of the execution that looks like this:
python -m cProfile test_solver.py
       11820359 function calls (11820279 primitive calls) in 8.454 seconds

 Ordered by: cumulative time

 ncalls  tottime  percall  cumtime  percall filename:lineno(function)
   14/1    0.001    0.000    8.454    8.454 {built-in method builtins.exec}
      1    0.000    0.000    8.454    8.454 test_solver.py:1(<module>)
      1    0.023    0.023    8.440    8.440 test_solver.py:62(test_s_path_cached)
      1    0.000    0.000    8.417    8.417 test_solver.py:28(_test_algo)
     14    1.749    0.125    8.416    0.601 solver.py:214(s_path_details)
      1    0.000    0.000    8.416    8.416 solver.py:312(s_path_cache)
<snip>
however it is often desirable to sort this output, in order to spot the functions that are most time-consuming; for that you can use the
sortoption, like this:# if you want to sort e.g. by number of calls # ↓↓↓↓↓↓↓↓↓ python -m cProfile -s ncalls test_solver.py | head -n 10 11820359 function calls (11820279 primitive calls) in 8.440 seconds Ordered by: call count ncalls tottime percall cumtime percall filename:lineno(function) 2682990 1.118 0.000 1.118 0.000 <string>:2(__lt__) 1633143 0.318 0.000 0.318 0.000 solver.py:82(__hash__) 786460 0.262 0.000 0.262 0.000 solver.py:79(__eq__) 665280 0.714 0.000 1.248 0.000 solver.py:86(iter_moves) 544347 0.104 0.000 0.104 0.000 {method '__exit__' of '_thread.lock' objects}which will print the same output, but sorted by cumulative time (note that the
headcommand here is just a convenience to chop the output after the 10 first lines)
using this information, you can identify the bottleneck functions, and then focus on optimizing them
this is how for example how I was able to discard numpy arrays as a possible representation for the boards,
as profiling showed that they were incurring a significant overhead - the way I was using them at least